Using linux from within windows: ubuntu, bash, compiling c++ and more
There are a few ways to install and run C++ (or any other programming languages) from windows. For me at least, the easiest by far is to use the windows subsystem for linux (wsl). This essentially gives the best of both worlds - allowing you to (for example) use windows tools to manage and edit code, while still having full access to linux tools for compiling and running the code.
Note: this method is not actually using windows to compile or run the code (you are running linux from within windows) - so if you’re trying to test your code to see if it will compile and run properly in windows, this is not for you. If you just want to use and write code easily from within windows, and use linux tools to compile and run it, then this is the best and easiest solution I’ve found.
Jump to:
Installing WSL ubuntu bash on windows
With windows 10, you can now run ubuntu bash directly from windows. Other linux distributions are also available, but due to it’s popularity, unless you have a specific need for a different one, I’d stick to ubuntu.
For many, this will be a better option that trying to dual boot or run a virtual machine. It’s command-line only (though it does allow screen-forwarding), and gives reasonably full linux functionality without the resource-hog of a virtual machine, and without the pain or hassle of dual booting. This is not a virtual machine, and it’s essentially a full version of ubuntu (unlike cygwin etc). There are many advantages of this, including have full access the the computers resources from both windows and wsl/bash.
-
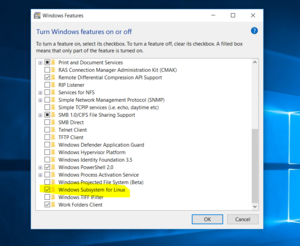
Enable the windows subsystem for linux in windows features
-
Open “turn Windows features on or off” by searching under the start menu
-
Check the “windows subsystem for linux” option
-
You will need to restart your pc for this to take affect
-
-
Install ubuntu (or another linux distro) from the windows store
- Search “windows store” in the start menu, then search for “ubuntu”
-
The first time running wsl, it will prompt you to setup a user account; just follow the prompts
Note that not all versions of windows 10 support the feature. For detailed installation instructions, see previous blog post (though now a bit out of date), and official documentation:
-
https://docs.microsoft.com/en-au/windows/wsl/install-win10 [installation]
-
https://docs.microsoft.com/en-au/windows/wsl/about [general about]
Some basics of using WSL
Once installed, you can run bash from the start menu shortcut.
Alternatively, from a command prompt (or power shell), run the command
“bash” or “wsl” to open bash. You can then do (essentially) anything
here that you would normally wish to do on a linux command-line
terminal, including installing programs, updating the system/packages,
viewing editing files, running programs etc.
For example: manage and update the linux distribution as per usual (it’s
recommended to keep things nice and updated):
    $ sudo apt-get update
    $ sudo apt-get upgrade
As well as installing new programs etc. etc, e.g.
$ sudo apt-get install <package_name>
If you run bash from the start menu shortcut, you will start from your
linux home directory, with a linux-type file system structure. If you
run from a windows command prompt, bash start in whichever directory the
cmd prompt was using.
You can check the full linux working directory as per usual by typing
- $ pwd
You can quickly navigate back to the linux home directory
- $ cd ~
To access windows files, you can just navigate to the correct directory. The windows files/drives are located inside the linux /mnt/ directory. For example, to navigate to my windows desktop:
- $ cd /mnt/c/Users/Ben/Desktop/
You can then create directories, edit files etc. using linux tools, and all these changes will be visible and editable from windows as well. Note: I would suggest being very careful here - rm * works, and there is no recycle bin.
To open a cmd prompt from the current windows directory (just to save you from having to cd through folders), do [shift+right click]{style=”text-decoration:underline”}, and choose ‘open power shell window here’ (or ‘open command prompt here’).
For more info, see:
Warning: while accessing windows files using linux tools with wsl is supported, using windows tools to access the linux file system is not. It is possible to navigate to the linux system files (including the linux home directory etc.) from inside windows - but you shouldn’t. Don’t worry, it’s hard to do this by mistake - but in case you were going to try, check these out first:
Using graphics forwarding, GUI programs
It doesn’t seem like it’s technically supported, but you can actually use display forwarding to let you use graphical interface for certain programs. To do this, you need an X server that runs on windows, the common choice is Xming:
Once downloaded, run the Xming .exe, you should see the icon in the task bar. This is the same as if you were display forwarding using ssh (with putty, for example). That’s all we need from the windows side.
Now, we need to tell bash to forward graphical display with the command:
- $ export DISPLAY=:0
and that’s it, it should work now.
As an example, we can use the plotting program gnuplot. Note, you have to have gnuplot-x11 installed, not just the standard gnuplot:
- $ sudo apt-get install gnuplot-x11
Then, start gnuplot and try plotting sin(x):
  -  $ gnuplot
  -  gnuplot> plot sin(x)
Official gnuplot page: http://www.gnuplot.info/
however, you’ll probably have more luck finding working examples on
forums by googling specific questions.
Compiling and running c++ (and other) code
First, you need to install a c++ compiler (though this will probably already be installed by default)
- $ sudo apt-get install g++
And the same for fortran (e.g., gfortran) python (e.g., python3) etc.
Then you can compile c++ programs just as you would through any other
linux terminal, e.g.,
- $ g++ hello.cpp -o hello.x
Or you can use make, etc. etc.
Installing libraries
In many cases you’ll need to install some libraries that are needed by
the code. For my code in particular, you’ll need LAPACK, BLAS, and the
GSL libraries.
The GNU Scientific Library (GSL) is a collection of routines for
numerical computing. I like them because they are open and free, easy to
use, and well documented. Full documentation is available here:
To do a full install:
- $ sudo apt-get install libgsl0-dev
Linear algebra libraries LAPACK, BLAS are used by GSL and others, so must also be installed (if not already). For a full installation:
$ sudo apt-get install libblas-dev libatlas-dev liblapack-dev
Using git
You can either use command-line git installed through linux, or (so long
as you’re editing files in the windows filesystem) you can use git on
windows.
For example, you may want to use github desktop for windows, and edit
the code using atom or visual studio on windows, and then compile and
run the code through a wsl bash terminal (you can even set the latest
version of windows studio to use wsl to compile + run the code).
Turn off that beeping bell
Because whoever designed this is a beeping sadist, it comes with an
in-built “everything’s OK” alarm, and beeps at you every time you do
anything.
1) Turn off bell for terminal. Edit the inputrc file (using sudo)
- $ sudo vim /etc/inputrc
and add the following line:
- set bell-style none
2) Even after that, vim still beeps every time you press ‘esc’…
yeah..
To fix this, edit the hidden vimrc file (which may not already exist):
- $ vim ~/.vimrc
and add the following line:
- set visualbell